Meta Description:
Contents
Learn how to make an LED blinker circuit with Arduino. Step-by-step tutorial with circuit diagram, code, and components list. Perfect DIY starter project!
📝 Introduction:
Want to get started with Arduino but don’t know where to begin? The LED Blinker project is one of the most popular and easiest ways to dive into DIY electronics. In this guide, you’ll learn how to build it step-by-step, understand the logic, and even download the code—all while gaining confidence for more advanced projects.
Whether you’re a hobbyist, student, or curious tinkerer, this project is a perfect starting point.
🧰 What You’ll Need (Components List):
| Component | Quantity |
|---|---|
| Arduino Uno (or Nano) | 1 |
| LED (any color) | 1 |
| 220-ohm Resistor | 1 |
| Breadboard | 1 |
| Jumper Wires | ~3 |
| USB Cable | 1 |
👉 Need the components? Order this LED Blinker Kit here or check DIY Kits & Parts.
🧭 Circuit Diagram:
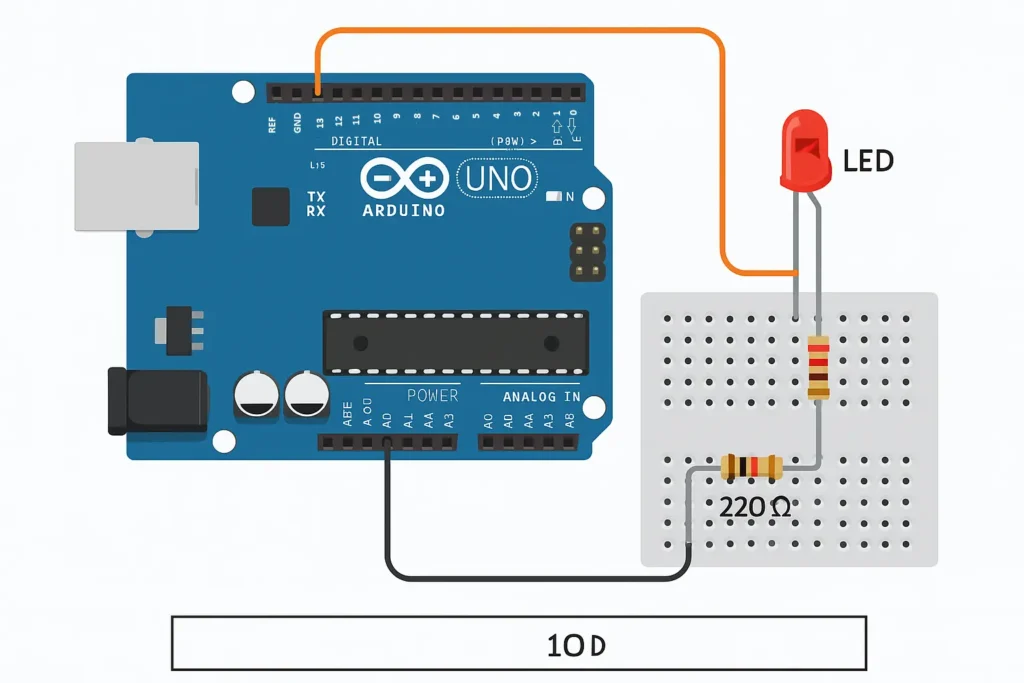
Connections:
- LED Anode (long leg) → Digital Pin 13 via 220Ω resistor
- LED Cathode → GND on Arduino
🛠️ Step-by-Step Instructions:
- Place the LED on the breadboard.
- Connect the 220Ω resistor to the anode leg of the LED.
- Connect the other end of the resistor to pin 13 on the Arduino.
- Connect the LED’s cathode to GND.
- Plug in the Arduino via USB.
- Open Arduino IDE on your computer.
🧾 Arduino Code:
cppCopyEditvoid setup() {
  pinMode(13, OUTPUT); // Set pin 13 as output
}

void loop() {
  digitalWrite(13, HIGH); // Turn LED on
  delay(1000);            // Wait 1 second
  digitalWrite(13, LOW);  // Turn LED off
  delay(1000);            // Wait 1 second
}
⚙️ How It Works:
- The code uses pin 13, which is connected to the LED.
digitalWrite(13, HIGH)turns the LED on.- After a 1-second delay, the LED is turned off.
- This repeats endlessly in the
loop()function, creating the “blinking” effect.
🧯 Troubleshooting Tips:
- LED not blinking? Check the polarity (anode/cathode).
- Double-check your resistor value (should be ~220Ω).
- Make sure the Arduino is properly connected via USB.
- Use the Tools > Port menu in Arduino IDE to select the right COM port.
🛒 Order the Kit or Components
Want to skip sourcing parts one by one?
👉 Click here to order the full LED Blinker Kit from us
Or check out our DIY Kits & Components Page
❓FAQs:
Q: Can I use a different pin instead of pin 13?
Yes, just change the number in the code and connect the LED accordingly.
Q: What if I don’t have a breadboard?
You can use jumper wires directly or even solder it temporarily.
Q: Is this safe for kids?
Yes, this is a low-voltage, beginner-friendly project. Supervised use is recommended.
💬 Have an Idea? Drop a Comment Below!
🔥 Want to see this project built with multiple LEDs?
💡 Have a logo idea for Toolopediax.com?
🔧 Want a tutorial on your favorite project next?
Tell us in the comments below — we’re building this site with makers like you in mind!