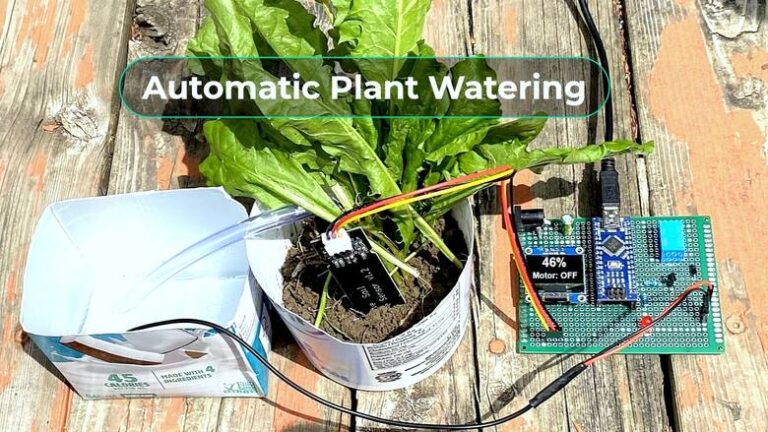
Do you often forget to water your plants? Or maybe you’re looking for a way to automate plant care while you’re away? A Smart Plant Watering System is the perfect DIY solution! In this guide, you’ll learn how to build an automatic watering system using an Arduino, a soil moisture sensor, and a water pump — no prior experience required.
What Is a Smart Plant Watering System?
Contents
A Smart Plant Watering System is a simple automated setup that detects when the soil is dry and automatically waters the plant. It’s ideal for home gardening, indoor plants, school science projects, or even agriculture experiments. It ensures your plants get water only when needed, saving both time and water.
Key Features
- 🌱 Automatic moisture detection
- 🚿 Water pump control with relay
- 🔧 Adjustable soil dryness threshold
- 🔋 Low power and efficient
- 📦 Simple and low-cost components
- 📱 Upgradeable to IoT (ESP8266/ESP32)
Components Required
| Component | Quantity |
|---|---|
| Arduino UNO or Nano | 1 |
| Soil Moisture Sensor | 1 |
| Relay Module (1-channel) | 1 |
| Submersible Water Pump | 1 |
| Power Supply (5V or 12V) | 1 |
| Jumper Wires | As needed |
| Tubing for Water | As needed |
| Breadboard (optional) | 1 |
Circuit Diagram
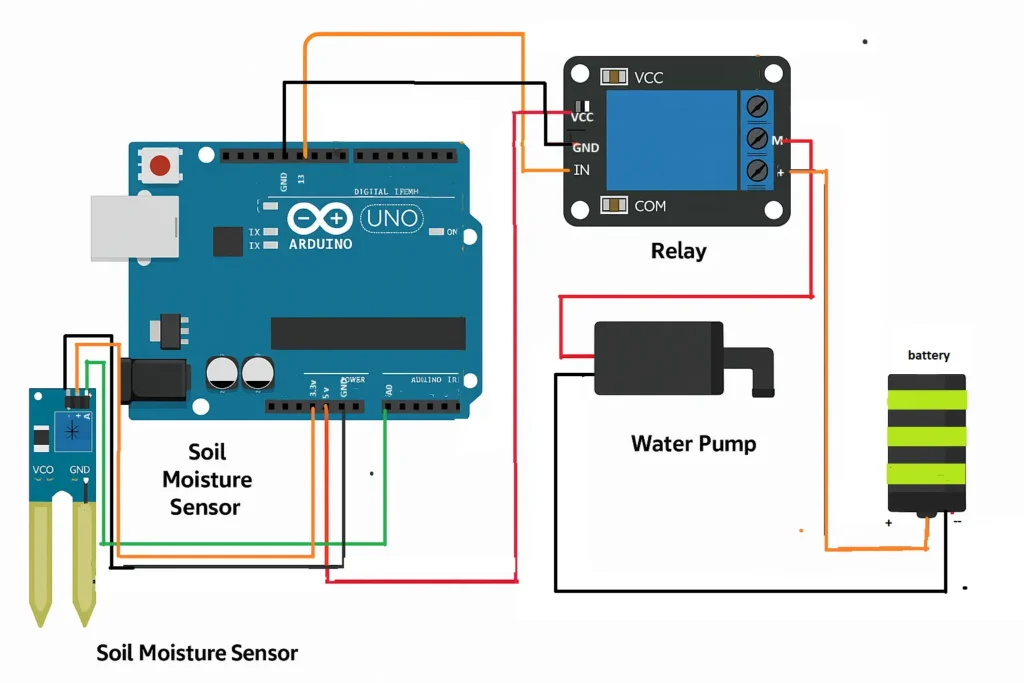
Here’s how the connections are made:
- Soil Sensor:
- VCC → 5V (Arduino)
- GND → GND (Arduino)
- A0 → A0 (Arduino)
- Relay Module:
- VCC → 5V (Arduino)
- GND → GND (Arduino)
- IN → D7 (Arduino)
- Pump Connection via Relay:
- Pump +ve → Relay NO (Normally Open)
- Pump -ve → GND (Power Supply)
- Power Supply +ve → Relay COM
⚠️ Note: Ensure the Arduino and power supply share a common ground if using an external power source.
How to Make It (Step-by-Step)
🛠️ Step 1: Set Up the Sensor
Insert the soil moisture sensor into the plant pot. Connect the sensor wires to A0, 5V, and GND.
🔌 Step 2: Connect the Relay & Pump
Wire the relay module and the pump as shown in the diagram. Ensure correct polarity to avoid pump damage.
💾 Step 3: Upload the Arduino Code
Plug the Arduino into your computer and upload the code provided below using the Arduino IDE.
🔋 Step 4: Power Up & Test
Power your Arduino and pump. Dry the soil and watch the pump start automatically. Wet the soil to stop the pump.
Arduino Code
cppCopyEditconst int soilPin = A0;
const int relayPin = 7;
int threshold = 400;

void setup() {
  pinMode(relayPin, OUTPUT);
  digitalWrite(relayPin, HIGH); // Turn pump OFF initially
  Serial.begin(9600);
}

void loop() {
  int soilMoisture = analogRead(soilPin);
  Serial.print("Soil Moisture: ");
  Serial.println(soilMoisture);

  if (soilMoisture < threshold) {
    digitalWrite(relayPin, LOW); // Turn ON pump
    Serial.println("Soil dry - Watering...");
  } else {
    digitalWrite(relayPin, HIGH); // Turn OFF pump
    Serial.println("Soil wet - Pump OFF");
  }
  delay(1000); // Wait 1 second
}
📌 Tip: The threshold value (~400) depends on your soil and sensor type. You may need to calibrate it by testing with wet and dry soil.
How It Works
The soil moisture sensor sends analog values (0 to 1023) to the Arduino. When the moisture level drops below the set threshold:
- The Arduino activates the relay
- The relay powers the pump
- Water flows to the plant
- When soil is moist again, the pump stops
This simple loop automates your plant care without wasting water.
FAQs
❓ Can I use a battery instead of a power adapter?
Yes! Use a 9V or 12V battery (or Li-ion pack), but make sure it matches the pump’s voltage and has enough capacity.
❓ What if I want to water multiple plants?
Use multiple moisture sensors and pumps, or one pump with valves and extra code logic.
❓ Can I make this IoT-enabled?
Absolutely. Replace Arduino with an ESP8266 or ESP32 and send soil data to your phone via Blynk or ThingSpeak.
❓ Is it waterproof and safe?
Use a sealed pump and place electronics away from water. Optional: use waterproof enclosures for outdoor use.
Final Thoughts
Building a Smart Plant Watering System is a fantastic way to learn automation, sensors, and Arduino programming. Whether you’re caring for a houseplant or testing a school science project, this system makes plant care easy and efficient.
You can always upgrade it with:
- LCD displays for moisture levels
- Wi-Fi for remote monitoring
- Solar power for outdoor automation
🌿 Start building and let your plants water themselves and If you face any problems while making it, let me know in the comments section.