🔍 Introduction
Contents
If you’ve ever worked with Arduino boards and felt limited by memory or processing speed, the Arduino Due might just be the upgrade you need. Designed for more powerful projects, the Due opens doors to real-time data processing, advanced robotics, IoT, and more.
In this complete guide, we’ll break down everything about Arduino Due—from features and specifications to real-world applications and comparison with other popular Arduino boards like Uno, Mega, and Leonardo. Let’s get started!
⚙️ What is Arduino Due?
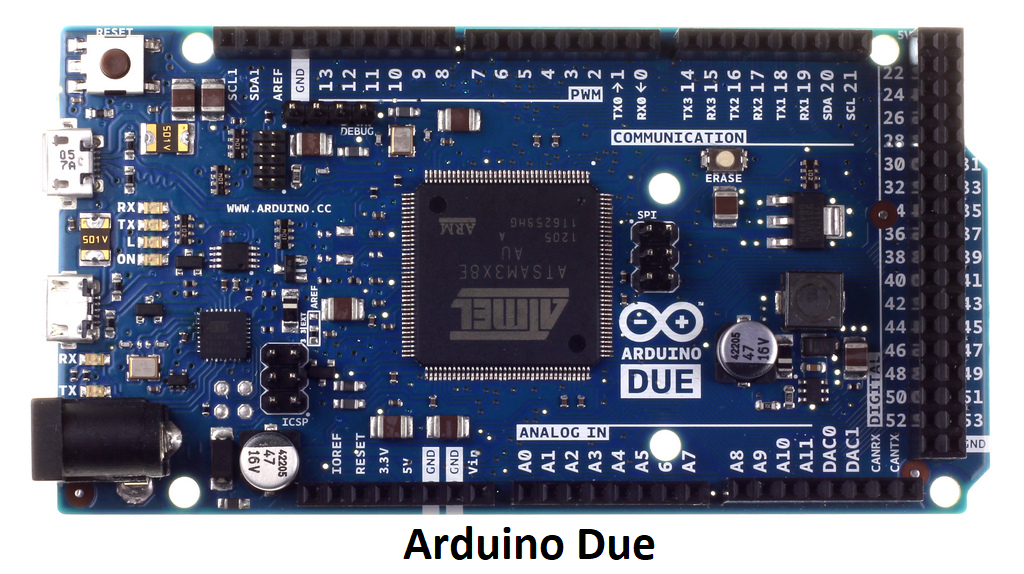
The Arduino Due is a 32-bit microcontroller board based on the Atmel SAM3X8E ARM Cortex-M3 processor. It was the first Arduino board to use a 32-bit ARM core, making it significantly faster and more powerful than most 8-bit AVR-based boards like the Uno or Mega.
It’s best suited for complex projects that require:
- Higher processing power
- More memory
- Multiple I/O ports
- Native USB Host support
📦 Features of Arduino Due
| Feature | Specification |
|---|---|
| Microcontroller | Atmel SAM3X8E ARM Cortex-M3 (32-bit) |
| Operating Voltage | 3.3V (NOT 5V tolerant) |
| Input Voltage | 7V to 12V recommended |
| Digital I/O Pins | 54 (12 PWM outputs) |
| Analog Inputs | 12 |
| Analog Outputs | 2 (DACs) |
| Clock Speed | 84 MHz |
| Flash Memory | 512 KB |
| SRAM | 96 KB |
| EEPROM | None (use external EEPROM if needed) |
| USB Ports | Programming Port & Native USB Port |
| Communication | UART, I2C, SPI, CAN |
✅ Pro Tip: The Arduino Due works on 3.3V logic, so connecting 5V devices directly to its I/O pins can damage the board.
🔌 Pinout and Circuit Overview
The Arduino Due pinout is extensive and similar in layout to the Arduino Mega, which makes it physically compatible with many Mega shields—but beware: logic levels differ.
Key Pin Sections:
- Digital Pins (0-53): For general input/output
- PWM Pins (2-13): For motor control, dimming LEDs
- Analog Inputs (A0-A11): Read sensors and voltages
- DAC0/DAC1: Generate analog voltage output (0–3.3V)
- Communication: UART (Serial), SPI, I2C, CAN
Circuit Connections Example
For a simple LED blink:
- Connect 220Ω resistor + LED to Pin 13
- Upload basic blink sketch using the Programming Port
Note: Use external power (7–12V) if powering motors/sensors.
💡 What Can You Do with Arduino Due?
Arduino Due isn’t just powerful—it’s flexible. Here are some cool projects where Due truly shines:
- ✅ Advanced Robotics – Multiple motors, sensors, and real-time data processing
- ✅ Audio Projects – Due has DACs to output analog sound
- ✅ IoT Devices – Connect sensors and communicate over Wi-Fi/Bluetooth
- ✅ Data Loggers – With SD cards and fast processing
- ✅ MIDI Controllers – Thanks to native USB support
- ✅ Real-Time Sensor Fusion – Like IMU + GPS for drones
⚠️ Due does not support 5V shields or components directly—use level shifters!
⚖️ Arduino Due vs Other Arduino Boards
1. Arduino Due vs Arduino Uno
| Feature | Arduino Due | Arduino Uno |
|---|---|---|
| Architecture | 32-bit ARM Cortex-M3 | 8-bit AVR |
| Clock Speed | 84 MHz | 16 MHz |
| Flash Memory | 512 KB | 32 KB |
| Operating Voltage | 3.3V | 5V |
| USB Host Support | Yes | No |
Verdict: If you’re stepping up from basic projects to complex tasks like audio processing, Due is the winner. For simpler, beginner-friendly projects, Uno is enough.
2. Arduino Due vs Arduino Mega 2560
| Feature | Arduino Due | Arduino Mega |
|---|---|---|
| Architecture | 32-bit ARM Cortex-M3 | 8-bit AVR |
| Clock Speed | 84 MHz | 16 MHz |
| Flash Memory | 512 KB | 256 KB |
| USB Ports | Dual USB (Host & Prog) | Single USB |
| Operating Voltage | 3.3V | 5V |
Verdict: Both boards offer lots of pins, but Due provides superior performance and native USB capabilities. Mega is safer for beginners due to 5V logic compatibility.
3. Arduino Due vs Arduino Leonardo
| Feature | Arduino Due | Arduino Leonardo |
|---|---|---|
| USB Native | Yes | Yes |
| Clock Speed | 84 MHz | 16 MHz |
| RAM | 96 KB | 2.5 KB |
| Suitable for HID | Yes | Yes |
Verdict: Both boards have USB HID support, but Due is better for large-scale or memory-heavy applications.
🛠️ How to Use Arduino Due
1. Install Arduino IDE
Download from arduino.cc
2. Add Board Support
- Go to Tools > Board > Boards Manager
- Search for “Arduino SAM Boards (32-bits ARM Cortex-M3)”
- Click Install
3. Select the Right Port
- Board: Arduino Due (Programming Port)
- Port: Usually COMx (Windows) or /dev/tty.usbmodem (Mac/Linux)
4. Upload Example Sketch
cppCopyEditvoid setup() {
  pinMode(13, OUTPUT);
}
void loop() {
  digitalWrite(13, HIGH);
  delay(500);
  digitalWrite(13, LOW);
  delay(500);
}
5. Common Issues
- “No device found” – Try using the Programming Port instead of Native USB
- Upload failure – Check that your power supply is adequate
🤔 FAQs About Arduino Due
Q1: Can I use 5V sensors with Arduino Due?
No. Use logic level converters or choose 3.3V-compatible sensors.
Q2: Is Arduino Due good for beginners?
Not recommended. Due is powerful but requires careful handling due to 3.3V logic and higher complexity.
Q3: Why does Arduino Due not have EEPROM?
The SAM3X8E lacks onboard EEPROM. You can simulate EEPROM in Flash or use external EEPROM via I2C.
Q4: Can I run motors with Arduino Due?
Yes, but always use motor drivers like L298N or DRV8833. Never drive motors directly from GPIO.
Q5: Can I program Arduino Due using PlatformIO?
Absolutely! PlatformIO supports Arduino Due for professional-grade projects and better library handling.
🧠 Final Thoughts – Should You Use Arduino Due?
The Arduino Due is like the “pro league” of Arduino boards. It’s:
- Extremely fast
- Rich in memory
- Capable of handling complex, real-time projects
However, it also demands:
- More caution (3.3V logic only)
- More knowledge (no built-in EEPROM, multiple USB ports)
- More planning (some shields not compatible)
If you’re building advanced applications—like audio processing, USB HID devices, or complex sensor networks—the Due is the best choice in the Arduino ecosystem.