If you’re building a large-scale electronic project and running out of pins on your Arduino Uno or Nano, there’s a simple answer — the Arduino Mega. Known as the “big brother” of the Arduino family, the Mega is packed with more memory, more pins, and more power.
Whether you’re working on a 3D printer, a CNC machine, a home automation system, or a robotic arm, the Arduino Mega provides the flexibility and resources you need.
📦 What is Arduino Mega?
Contents
- 1 📦 What is Arduino Mega?
- 2 🔍 Arduino Mega 2560: Key Specifications
- 3 🧠 Why Choose Arduino Mega?
- 4 📊 Arduino Mega vs Other Boards
- 5 🛠️ Common Applications of Arduino Mega
- 6 🧪 Sample Project: Home Automation with Arduino Mega
- 7 ⚙️ Pin Configuration (Simplified)
- 8 🔌 How to Power Arduino Mega
- 9 👨💻 Programming the Arduino Mega
- 10 🧰 Real-Life Project Ideas Using Arduino Mega
- 11 💬 FAQs about Arduino Mega
- 12 🧾 Summary
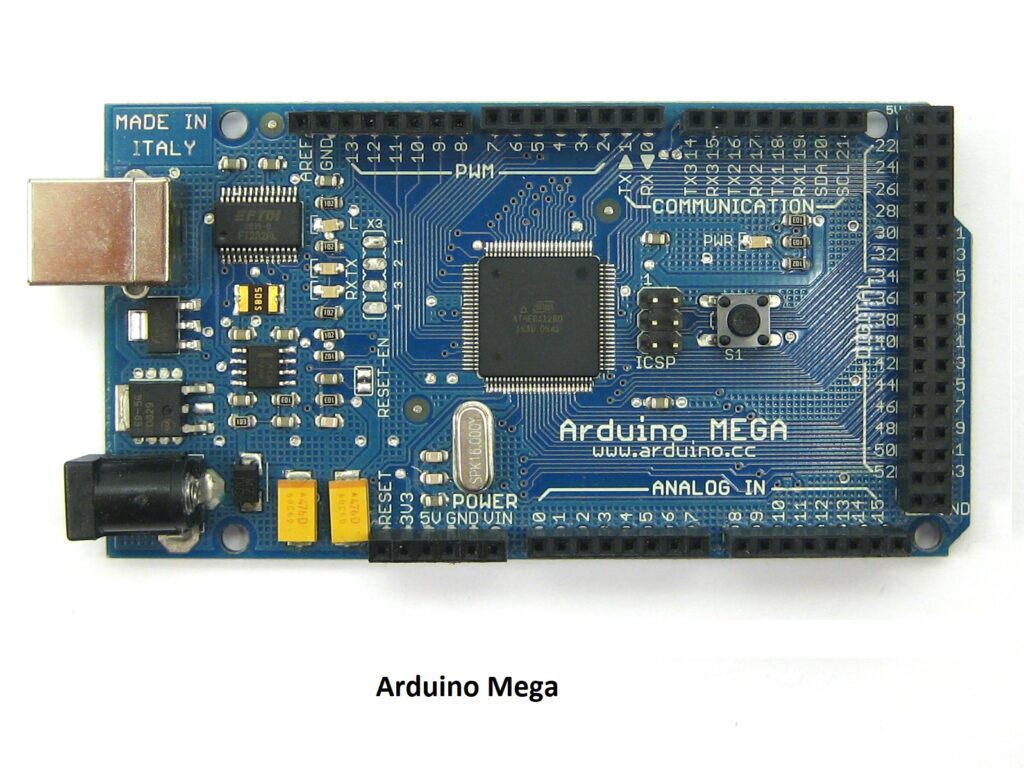
The Arduino Mega 2560 is a microcontroller board based on the ATmega2560 chip. It was designed for more complex projects that require a large number of input/output (I/O) pins and more memory. With 54 digital I/O pins, 16 analog inputs, and 256 KB of flash memory, it outperforms other Arduino boards in terms of capacity.
It’s like upgrading from a bicycle to a truck when your project grows.
🔍 Arduino Mega 2560: Key Specifications
| Feature | Details |
|---|---|
| Microcontroller | ATmega2560 |
| Operating Voltage | 5V |
| Input Voltage | 7–12V (recommended) |
| Digital I/O Pins | 54 (15 PWM outputs) |
| Analog Input Pins | 16 |
| Flash Memory | 256 KB (8 KB used by bootloader) |
| SRAM | 8 KB |
| EEPROM | 4 KB |
| Clock Speed | 16 MHz |
| USB Connection | Type-B USB |
| Size | 101.52 mm x 53.3 mm |
🧠 Why Choose Arduino Mega?
If you’re still wondering whether you need the Mega, here are a few reasons to say yes:
✅ Ideal for Large-Scale Projects:
When you’re dealing with dozens of sensors, motors, buttons, and displays, Mega’s 54 digital pins make it the go-to choice.
✅ More Memory:
With 8 KB SRAM and 256 KB flash memory, it can handle large programs with ease — including complex libraries like TFT displays, multiple sensors, and Wi-Fi modules.
✅ Robust Power Options:
Supports both USB and external power through a barrel jack or Vin pin.
📊 Arduino Mega vs Other Boards
Let’s see how Mega compares with Uno and Nano:
| Feature | Arduino Mega | Arduino Uno | Arduino Nano |
|---|---|---|---|
| Microcontroller | ATmega2560 | ATmega328P | ATmega328P |
| Digital I/O Pins | 54 | 14 | 14 |
| Analog Input Pins | 16 | 6 | 8 |
| PWM Outputs | 15 | 6 | 6 |
| Flash Memory | 256 KB | 32 KB | 32 KB |
| SRAM | 8 KB | 2 KB | 2 KB |
| Size | Large | Medium | Small |
| USB Type | Type-B | Type-B | Mini USB |
| Best For | Big Projects | Beginners | Compact Projects |
🧠 Use Mega when your Uno runs out of space or pins — especially in robotics, automation, or 3D printing.
🛠️ Common Applications of Arduino Mega
Here’s where the Mega shines:
- 3D Printers (like Prusa, Anet)
- Home Automation Systems
- Robotic Arms with Multiple Servos
- IoT Gateways with Multiple Sensors
- LED Matrix Projects
- Custom Keyboards
- CNC Machines
🧪 Sample Project: Home Automation with Arduino Mega
Imagine automating your home with:
- Motion sensors (PIR)
- Temperature sensors (DHT11/22)
- Relays for lights and fans
- LCD display
- Bluetooth module
- Wi-Fi (ESP8266)
With the Mega, you have enough pins to connect them all without using I/O expanders.
⚙️ Pin Configuration (Simplified)
- Digital Pins D0–D53: Digital input/output, including serial and PWM
- Analog Pins A0–A15: For reading analog signals
- PWM Pins: 2–13 and 44–46
- Serial Ports: 4 total (Serial, Serial1, Serial2, Serial3)
- SPI Pins: 50 (MISO), 51 (MOSI), 52 (SCK), 53 (SS)
- I2C Pins: 20 (SDA), 21 (SCL)
🔧 Tip: Mega supports multiple hardware serial ports, so you can talk to Bluetooth, GPS, and Serial Monitor at the same time!
🔌 How to Power Arduino Mega
You can power it in three ways:
- USB (via Type-B port)
- DC Barrel Jack (7–12V recommended)
- Vin Pin (External voltage input)
Use the on-board voltage regulator for safe operation if you’re using batteries.
👨💻 Programming the Arduino Mega
Just like any Arduino board, use the Arduino IDE. Go to:
yamlCopyEditTools → Board → Arduino Mega or Mega 2560
Processor → ATmega2560 (Mega 2560)
Then connect your board, select the COM port, and you’re ready.
🧪 Sample Code: LED Chaser (Multiple LEDs)
cppCopyEditint pins[] = {2, 3, 4, 5, 6};

void setup() {
  for (int i = 0; i < 5; i++) {
    pinMode(pins[i], OUTPUT);
  }
}

void loop() {
  for (int i = 0; i < 5; i++) {
    digitalWrite(pins[i], HIGH);
    delay(100);
    digitalWrite(pins[i], LOW);
  }
}
🧰 Real-Life Project Ideas Using Arduino Mega
- Smart Agriculture System
- IoT Smart Home Hub
- Voice-Controlled Robot
- Security Access System
- IoT Energy Monitor
- Data Logger with SD + RTC + GSM
⚠️ If buying a clone, check the USB-to-serial chip (CH340 or ATmega16U2) and install drivers accordingly.
💬 FAQs about Arduino Mega
Q1. Can I use Arduino Mega instead of Uno?
Yes! It’s backward compatible. You may need to adjust your code if you’re using more pins or serial ports.
Q2. Is the Arduino Mega beginner-friendly?
It’s easy to use like all Arduinos, but better suited for intermediate to advanced users with complex requirements.
Q3. Does Arduino Mega support Wi-Fi?
Not built-in. Use external modules like ESP8266 or ESP32 via UART or SPI.
Q4. Why does Arduino Mega have 4 serial ports?
To enable multiple devices like GPS, GSM, Bluetooth, and Serial Monitor all to work together.
Q5. Can I use shields with Arduino Mega?
Yes, it’s compatible with most Uno shields. Just check the pin mappings if needed.
🧾 Summary
The Arduino Mega is a powerhouse board tailored for advanced projects requiring high I/O counts and memory. It’s overkill for small LED blinkers but a must-have for automation, robotics, or multi-sensor environments.
🚀 Why Choose Arduino Mega?
- High performance with tons of I/O pins
- Large memory for big sketches
- Multiple serial ports for real-time communication
- Ideal for big DIY and industrial-grade projects
So, if your Uno feels cramped and Nano too small, Arduino Mega is your ultimate upgrade path.