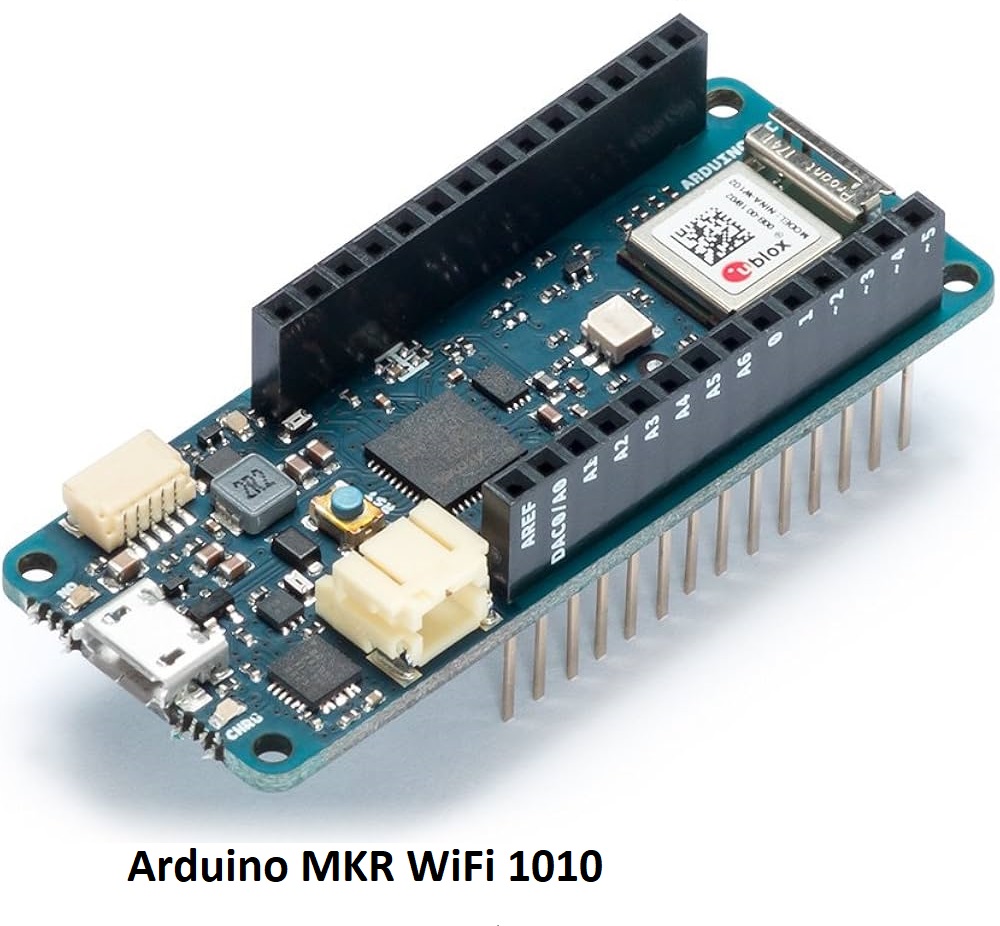
The Arduino MKR WiFi 1010 is more than just another development board. Designed specifically for IoT (Internet of Things) applications, it brings together powerful wireless capabilities, a compact form factor, and ease of use that makes it ideal for both beginners and advanced makers.
In this guide, we’ll dive deep into its features, how it works, use cases, and compare it with other popular Arduino boards like the UNO WiFi Rev2, Nano 33 IoT, and ESP32.
Key Features of Arduino MKR WiFi 1010
Contents
- 1 Key Features of Arduino MKR WiFi 1010
- 2 Why Choose MKR WiFi 1010 for IoT?
- 3 How Arduino MKR WiFi 1010 Works
- 4 How to Use Arduino MKR WiFi 1010
- 5 Popular Projects with MKR WiFi 1010
- 6 Arduino MKR WiFi 1010 vs Other Boards
- 7 Arduino MKR WiFi 1010 Pinout and Description
- 8 What You Get in the Box
- 9 FAQs – Arduino MKR WiFi 1010
- 10 Final Thoughts
Let’s take a look at what makes the MKR WiFi 1010 stand out:
| Feature | Details |
|---|---|
| Microcontroller | SAMD21 Cortex-M0+ (32-bit ARM) |
| Wi-Fi Module | u-blox NINA-W102 |
| Bluetooth | BLE (Bluetooth Low Energy) |
| USB Interface | Native USB for programming & power |
| Operating Voltage | 3.3V |
| Input Voltage (Vin) | 5V through USB or Li-Po battery |
| Digital I/O Pins | 8 (PWM on all) |
| Analog Input Pins | 7 |
| Flash Memory | 256 KB |
| SRAM | 32 KB |
| Clock Speed | 48 MHz |
| Battery Connector | JST for 3.7V Li-Po battery |
| Security Chip | ECC508 CryptoAuthentication |
Why Choose MKR WiFi 1010 for IoT?
1. Built-In WiFi + BLE
Unlike the Arduino UNO or Nano, the MKR WiFi 1010 comes with a u-blox NINA-W102 module for dual connectivity—WiFi for the internet and BLE for local communication.
2. Crypto Chip for Secure Connections
It includes the ECC508A chip, allowing secure connections via SSL/TLS. This is essential for cloud-based IoT where data security is critical.
3. Low Power, Battery Ready
Thanks to the Li-Po battery connector, the MKR 1010 can operate wirelessly even without USB power. Ideal for remote sensor nodes.
4. Compact and Breadboard-Friendly
Its form factor is smaller than UNO but still big enough for real-world use. You can easily mount it on a breadboard for prototyping.
How Arduino MKR WiFi 1010 Works
Here’s a simplified breakdown of how it functions:
- Microcontroller handles logic, code execution, and interfaces with sensors/actuators.
- NINA-W102 module enables internet or local communication.
- Crypto Chip ensures encrypted communication.
- Power source can be USB, Li-Po battery, or external regulated 5V.
Whether you’re logging temperature data to the cloud or creating a smart irrigation system, the MKR 1010 gives you all the tools in one board.
How to Use Arduino MKR WiFi 1010
Step 1: Install Arduino IDE
Use the latest Arduino IDE. Add the Arduino SAMD Boards package via the Board Manager.
Step 2: Install Libraries
For WiFi:
cppCopyEdit#include <WiFiNINA.h>
For Cloud:
cppCopyEdit#include <ArduinoIoTCloud.h>
Step 3: Connect to Wi-Fi
cppCopyEditWiFi.begin("YourSSID", "YourPassword");
while (WiFi.status() != WL_CONNECTED) {
  delay(1000);
  Serial.println("Connecting...");
}
Serial.println("Connected!");
Step 4: Start Coding Your IoT App!
- Send sensor data to the cloud
- Create a smart home switch
- Build a location tracker
Popular Projects with MKR WiFi 1010
| Project Idea | Description |
|---|---|
| Smart Plant Monitor | Monitor soil moisture, send data to cloud |
| IoT Temperature Logger | Use with DS18B20 to log temperature remotely |
| BLE Beacon | Transmit BLE signals for mobile app detection |
| Secure Door Lock | Unlock with BLE + smartphone authentication |
| Weather Station | Read humidity/temp and send to Google Sheets |
Arduino MKR WiFi 1010 vs Other Boards
Let’s see how the MKR 1010 compares with other IoT boards:
| Feature | MKR WiFi 1010 | Nano 33 IoT | UNO WiFi Rev2 | ESP32 |
|---|---|---|---|---|
| MCU | SAMD21 (32-bit ARM) | SAMD21 | ATmega4809 | Tensilica Xtensa |
| WiFi | Yes (NINA-W102) | Yes (NINA-W102) | Yes (u-blox) | Yes |
| BLE | Yes | Yes | No | Yes |
| USB | Yes | Yes | Yes | Yes |
| Battery Support | Yes (Li-Po) | No | No | Optional |
| Crypto Chip | Yes | Yes | No | Depends |
| Arduino Official | Yes | Yes | Yes | No (Espressif) |
| Price | Medium (~₹2000) | Lower (~₹1500) | Higher (~₹2200) | Lower (~₹500–800) |
Verdict:
- Choose MKR WiFi 1010 for secure, battery-powered IoT projects.
- Use Nano 33 IoT if you want similar features at a lower price and don’t need battery power.
- Prefer ESP32 for budget builds but be ready for more complex setup and support issues.’
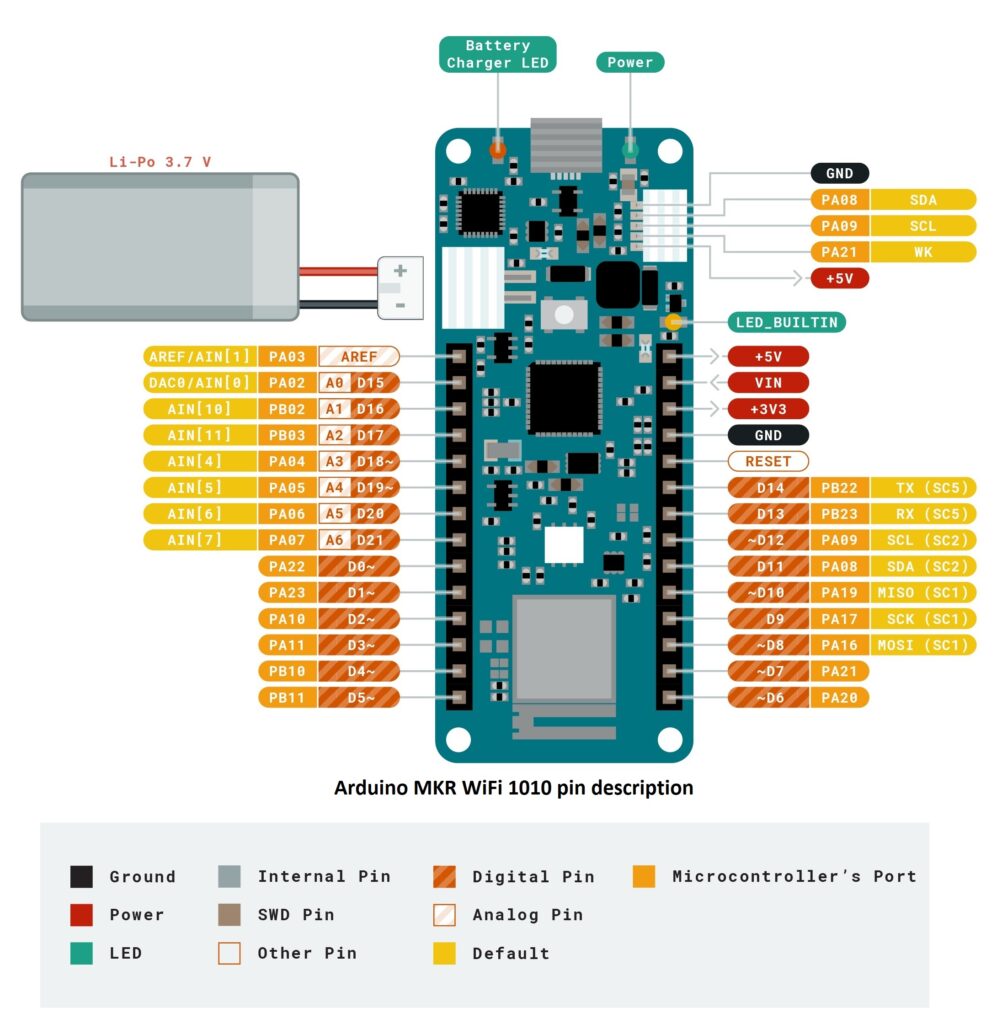
Arduino MKR WiFi 1010 Pinout and Description
Arduino MKR WiFi 1010 ke pins compact size ke bawajood kaafi powerful aur multipurpose hote hain. Board ke total pins ko hum categories me divide kar sakte hain:
Power Pins
| Pin | Description |
|---|---|
| VCC / 3.3V | 3.3V regulated output from the onboard regulator. Useful to power sensors. |
| Vin | External voltage input (5V recommended, range 5–6V). |
| GND | Ground pin. Common ground for all circuits. |
| BAT | Li-Po battery input (3.7V). You can connect a rechargeable battery here. |
| VUSB | USB supply voltage. Useful if you need to tap power from USB. |
Digital I/O Pins
| Pin | Function |
|---|---|
| D0 – D7 | General-purpose digital input/output pins. All support PWM. |
| D2 – D4 | Also used for I2C/SPI/UART depending on configuration. |
| D6, D7 | Often used as serial communication pins. |
All digital pins work at 3.3V logic (NOT 5V-tolerant).
Analog Pins
| Pin | Description |
|---|---|
| A0 – A6 | Analog input pins (ADC resolution: 12-bit). Can be used to read sensors. |
| A4 (SDA) | Also serves as I2C data line. |
| A5 (SCL) | I2C clock line. |
You can use analog pins as digital pins too (for GPIO).
Communication Pins
| Protocol | Pins | Description |
|---|---|---|
| UART (Serial) | D13 (TX) / D14 (RX) | For serial communication. Used for debugging or external modules. |
| I2C | A4 (SDA), A5 (SCL) | For sensors and displays. Connects multiple devices. |
| SPI | D8 (MISO), D9 (MOSI), D10 (SCK), D11 (SS) | High-speed communication with modules like SD card, RF transceivers. |
Special Function Pins
| Pin | Description |
|---|---|
| RESET | Resets the board manually. |
| SWDIO / SWCLK | Used for debugging with external programmers (like Atmel ICE). |
| RX LED | Blinks on receiving serial data. |
| USB Native Port | Used for programming and serial communication. |
⚠️ Important Notes
- Logic level is 3.3V only – Don’t connect 5V logic directly.
- Use a level shifter or voltage divider for 5V sensors.
- Onboard Crypto Chip (ECC508) is connected via I2C.
What You Get in the Box
When you buy the MKR WiFi 1010, you typically get:
- 1x MKR WiFi 1010 board
- Header pins (not always soldered)
- Quick start guide (in some kits)
To start, you might also need:
- Micro USB cable
- Breadboard & jumper wires
- Sensors or actuators depending on your project
FAQs – Arduino MKR WiFi 1010
❓ Is MKR WiFi 1010 beginner-friendly?
Yes, especially if you’re doing IoT projects. It’s easier than setting up WiFi manually on ESP32.
❓ Can it run on batteries?
Yes! It supports 3.7V Li-Po batteries directly.
❓ What makes it better than Arduino UNO?
It has WiFi, BLE, more memory, lower power consumption, and built-in security—all missing in UNO.
❓ Does it support Arduino Cloud?
Absolutely. It’s one of the recommended boards for Arduino IoT Cloud integration.
❓ Can I use it with Blynk or IFTTT?
Yes, using appropriate libraries and HTTP/MQTT protocols.
Final Thoughts
The Arduino MKR WiFi 1010 hits the sweet spot between ease of use, wireless capabilities, and security. Whether you’re a student working on a college IoT project or a hobbyist creating a smart home system, this board makes it simple to connect devices to the cloud safely.
If you’re serious about IoT development and want a hassle-free yet powerful board, MKR WiFi 1010 is a solid investment.
Related Boards:
- [Arduino Nano 33 IoT Guide] (coming soon)
- [Arduino UNO WiFi Rev2 vs MKR Comparison]
- [How to Use Arduino Cloud with MKR 1010]