If you’re into electronics, robotics, or IoT, chances are you’ve heard of the Arduino Nano. This tiny but mighty microcontroller board is a favorite among makers, students, and professionals. But what makes the Arduino Nano so popular? And how does it compare to other Arduino boards like the Uno or Micro?
In this complete guide, we’ll explore everything you need to know about the Arduino Nano — its features, pinout, applications, and comparisons — written in a natural tone that feels like a real person is talking to you.
🧠 What is Arduino Nano?
Contents
- 1 🧠 What is Arduino Nano?
- 2 🔍 Key Features at a Glance
- 3 ⚙️ Pinout Diagram
- 4 🔌 Applications of Arduino Nano
- 5 🧪 Sample Project: Temperature Logger with Nano
- 6 🤔 Why Choose Arduino Nano?
- 7 🔁 Comparison with Other Arduino Boards
- 8 🔧 Programming the Arduino Nano
- 9 🧰 Real-Life Project Ideas
- 10 🔋 Powering the Arduino Nano
- 11 💬 Frequently Asked Questions
- 12 🧾 Summary
The Arduino Nano is a small, breadboard-friendly microcontroller board based on the ATmega328P (or ATmega168 in earlier versions). It’s like a mini version of the Arduino Uno, offering similar functionality but in a much more compact form.
Why Nano?
Because it packs powerful features in a board that’s only 18 x 45 mm — small enough to fit into tight enclosures or wearable tech.
🔍 Key Features at a Glance
| Feature | Arduino Nano Specs |
|---|---|
| Microcontroller | ATmega328P |
| Operating Voltage | 5V |
| Input Voltage | 6–12V |
| Digital I/O Pins | 14 (6 PWM outputs) |
| Analog Input Pins | 8 |
| Flash Memory | 32 KB (2 KB used by bootloader) |
| SRAM | 2 KB |
| EEPROM | 1 KB |
| Clock Speed | 16 MHz |
| USB Interface | Mini USB (older) / Micro USB (clone) |
| Size | 45 mm x 18 mm |
⚠️ Note: The newer Arduino Nano Every and Nano 33 variants come with more features like Bluetooth and more memory — but we’ll get to that later.
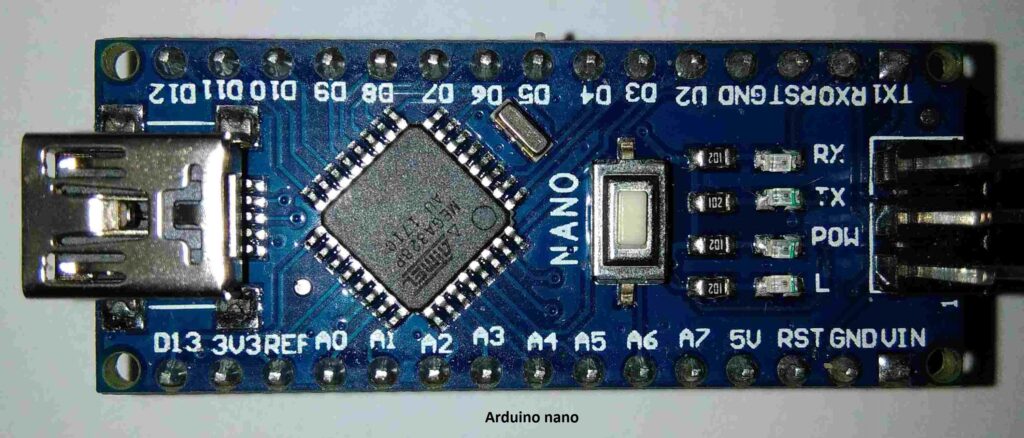
⚙️ Pinout Diagram
The Arduino Nano has two rows of pins that easily fit into a breadboard. Here’s a breakdown of some key pins:
- D0–D13: Digital I/O
- A0–A7: Analog inputs
- TX/RX: Serial communication
- RESET: Manual reset pin
- Vin: External voltage input (up to 12V)
- 5V/3.3V: Power output pins
- GND: Ground
💡 Use the “Vin” pin to power the board through an external battery or adapter.
🔌 Applications of Arduino Nano
Its small size makes it perfect for:
- Wearable devices
- Mini robots
- Portable gadgets
- IoT applications
- School and college projects
- Embedded systems
- Prototyping on breadboards
🧪 Sample Project: Temperature Logger with Nano
You can connect an LM35 or DS18B20 temperature sensor, log data to an SD card, and upload readings to the cloud using a Wi-Fi module like ESP8266. All with a Nano!
🤔 Why Choose Arduino Nano?
✅ Pros:
- Super compact
- Breadboard-friendly
- USB powered
- Affordable (clones available for under $3)
- Compatible with all Arduino libraries
- Ideal for compact or portable projects
❌ Cons:
- Lower I/O pin count compared to Mega
- No built-in Wi-Fi or Bluetooth (unless you choose Nano 33 IoT)
- USB port can break off in cheap clones
🔁 Comparison with Other Arduino Boards
Let’s see how Nano stands against popular alternatives:
| Feature | Arduino Nano | Arduino Uno | Arduino Micro | Arduino Nano 33 IoT |
|---|---|---|---|---|
| Size | 45×18 mm | 68×53 mm | 48×18 mm | 45×18 mm |
| MCU | ATmega328P | ATmega328P | ATmega32U4 | SAMD21 Cortex M0 |
| USB Type | Mini USB | USB Type B | Micro USB | Micro USB |
| Wi-Fi/Bluetooth | ❌ | ❌ | ❌ | ✅ |
| I/O Pins | 22 total | 20 total | 24 total | 22 total |
| Best For | Compact DIY | General Projects | USB HID Projects | IoT + Compact Projects |
🧠 Use Arduino Micro if you need USB Keyboard/Mouse emulation.
Use Nano 33 IoT if you need Wi-Fi/Bluetooth in a small board.
🔧 Programming the Arduino Nano
Just like other Arduino boards, Nano can be programmed using the Arduino IDE. Select the board type as Arduino Nano, and choose the right processor — usually “ATmega328P (Old Bootloader)” for clones.
🧪 Sample Code: Blink an LED
cppCopyEditvoid setup() {
  pinMode(13, OUTPUT); // Use built-in LED
}

void loop() {
  digitalWrite(13, HIGH);
  delay(1000);
  digitalWrite(13, LOW);
  delay(1000);
}
🧰 Real-Life Project Ideas
- Mini line follower robot
- Wearable health monitor
- Pocket-sized weather station
- Automated irrigation system
- IoT sensor node (with Nano + ESP8266)
⚠️ Be careful with cheap clones — always test the USB chip and voltage levels before plugging them into your PC.
🔋 Powering the Arduino Nano
There are three ways to power it:
- USB cable – 5V and serial communication
- Vin pin – 6–12V external battery or adapter
- 5V pin – Direct regulated 5V input
⚠️ Never connect more than 5V to the 5V pin directly — it may damage the board.
💬 Frequently Asked Questions
Q. Can Arduino Nano run on batteries?
Yes! Use 9V battery on Vin or 3.7V Li-ion with a regulator.
Q. Is the Nano good for beginners?
Absolutely. It’s ideal for breadboarding and learning microcontroller basics.
Q. What’s the difference between Arduino Nano and Uno?
Same chip (ATmega328P), but Nano is smaller and uses Mini USB.
Q. Can it control motors or relays?
Yes, via transistors or relay modules. It outputs 5V logic on digital pins.
Q. Is the Arduino Nano obsolete?
Not at all. In fact, new variants like Nano Every and Nano 33 IoT have enhanced features.
🧾 Summary
The Arduino Nano is a must-have board in any DIY electronics toolkit. Whether you’re building a wearable gadget, a mini robot, or a compact data logger, it delivers the power and flexibility of Arduino in a size smaller than a matchbox.
Highlights:
- Compact and versatile
- Affordable and easy to program
- Great for both beginners and pros
If you need something small and reliable, the Arduino Nano is one of the best boards to get started.