If you’re working on a motion-detection project or building smart home automation systems, the HC-SR501 PIR Sensor is your go-to choice. It’s affordable, easy to use, and perfect for detecting human movement. In this guide, we’ll explain everything you need to know about this sensor, including how it works, key features, technical specs, applications, connection diagrams, and FAQs.
Let’s dive in.
🔍 What is the HC-SR501 PIR Sensor?
Contents
- 1 🔍 What is the HC-SR501 PIR Sensor?
- 2 🧠 How Does the HC-SR501 PIR Sensor Work?
- 3 📦 Features of the HC-SR501 Sensor
- 4 🔧 HC-SR501 Sensor Pinout
- 5 ⚙️ HC-SR501 PIR Sensor Circuit Diagram
- 6 💡 Applications of HC-SR501 PIR Sensor
- 7 📋 Advantages of the HC-SR501 PIR Sensor
- 8 ⚠️ Limitations & Precautions
- 9 🧪 Testing the Sensor
- 10 🛠️ How to Use HC-SR501 Without Arduino
- 11 🧠 Tips to Improve Accuracy
- 12 🔄 Alternatives to HC-SR501
- 13 ❓ Frequently Asked Questions (FAQs)
- 14 🏁 Conclusion
The HC-SR501 PIR (Passive Infrared) Sensor is an electronic motion sensor module used to detect infrared light emitted by warm objects like humans and animals. It outputs a HIGH signal (3.3V) when motion is detected and LOW when idle.
Whether you’re building a motion-activated light, an intruder alarm, or a smart security camera, this sensor is perfect for DIY and embedded systems.
🧠 How Does the HC-SR501 PIR Sensor Work?
The HC-SR501 PIR sensor uses two main technologies:
- Pyroelectric Sensor – Detects changes in infrared radiation.
- Fresnel Lens – Focuses infrared light onto the sensor.
When a warm body (like a human) moves across the detection range, the sensor’s two halves detect a sudden change in infrared levels. This triggers the output to go HIGH.
Key Points in Working:
- Detects motion, not distance.
- Cannot detect still objects even if they are warm.
- Works best in indoor environments with minimal air movement.
📦 Features of the HC-SR501 Sensor
| Feature | Description |
|---|---|
| Voltage Range | 4.5V – 20V DC |
| Output | Digital (HIGH: 3.3V, LOW: 0V) |
| Detection Angle | ~120° |
| Detection Range | 3 to 7 meters (adjustable) |
| Delay Time | 5s – 300s (adjustable) |
| Trigger Mode | Single or Repeatable trigger |
| Operating Temp | –15°C to +70°C |
| Dimensions | 32mm x 24mm |
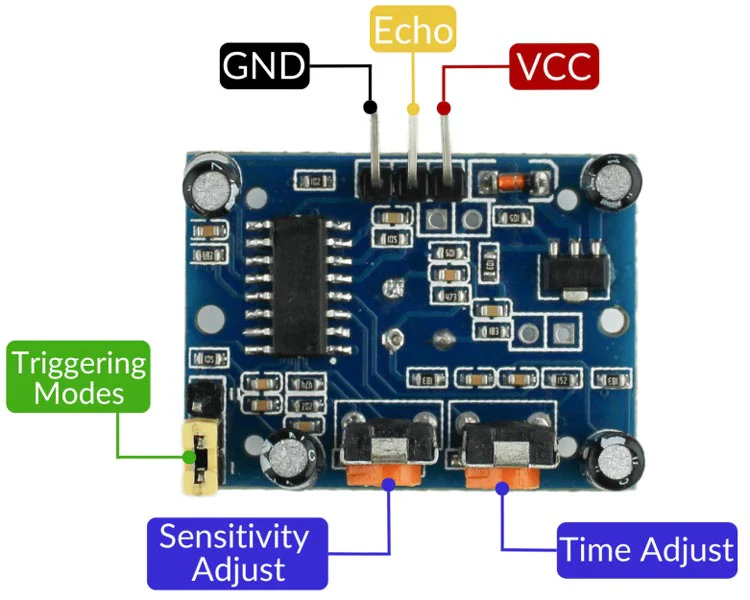
🔧 HC-SR501 Sensor Pinout
The module has three pins:
- VCC – Power supply (5V recommended)
- OUT – Output pin (connects to digital input like Arduino)
- GND – Ground
There are also two adjustable potentiometers:
- Time Delay – Controls how long output stays HIGH after motion is detected.
- Sensitivity – Adjusts the range of motion detection.
And a jumper for trigger mode:
- L = Single trigger
- H = Repeat trigger
⚙️ HC-SR501 PIR Sensor Circuit Diagram
Below is a basic connection diagram using an Arduino Uno:
sqlCopyEditHC-SR501      Arduino
---------     ---------
VCC     -->   5V
OUT     -->   Digital Pin 2
GND     -->   GND
Code Example:
cppCopyEditint pirPin = 2;
int ledPin = 13;

void setup() {
  pinMode(pirPin, INPUT);
  pinMode(ledPin, OUTPUT);
  Serial.begin(9600);
}

void loop() {
  int state = digitalRead(pirPin);
  if (state == HIGH) {
    digitalWrite(ledPin, HIGH);
    Serial.println("Motion Detected!");
  } else {
    digitalWrite(ledPin, LOW);
  }
  delay(100);
}
💡 Applications of HC-SR501 PIR Sensor
The HC-SR501 is widely used in the following real-world applications:
1. Motion Sensor Lights
Turns on lights automatically when someone enters a room or hallway.
2. Security Alarms
Detects unauthorized motion and triggers sirens or alerts.
3. Home Automation
Smart homes use PIR sensors to automate tasks based on human presence.
4. Energy Saving Systems
Turn off devices when no motion is detected to conserve energy.
5. Automatic Doors
Opens doors automatically as someone approaches.
6. Smart Bathrooms
Activates exhaust fans or lights when someone enters.
📋 Advantages of the HC-SR501 PIR Sensor
- ✅ Low power consumption
- ✅ Affordable & widely available
- ✅ No physical contact required
- ✅ Plug and play compatibility with Arduino
- ✅ Adjustable range and timing
⚠️ Limitations & Precautions
- ❌ Cannot detect stationary objects
- ❌ Sensitive to temperature changes and air drafts
- ❌ False triggers in outdoor or reflective environments
- ❌ Requires calibration time when first powered on (~30s)
🧪 Testing the Sensor
Step-by-Step Setup:
- Connect the VCC, GND, and OUT pins to Arduino.
- Upload the sample code.
- Open the Serial Monitor.
- Wave your hand in front of the sensor and observe “Motion Detected!” messages.
- Adjust range and delay using the potentiometers.
🛠️ How to Use HC-SR501 Without Arduino
The HC-SR501 can directly control a relay or LED circuit:
- Connect VCC to 5V, GND to ground, and OUT to transistor base or relay module.
- When motion is detected, OUT goes HIGH, triggering the load.
This makes it usable for standalone projects without microcontrollers.
🧠 Tips to Improve Accuracy
- Place at chest height (~4-5 ft) for human detection.
- Avoid facing mirrors, glass, or windows.
- Use Repeat Trigger Mode for continuous motion detection.
- Add a filter or shield to prevent wind or pets from triggering it.
🔄 Alternatives to HC-SR501
| Sensor | Range | Cost | Use Case |
|---|---|---|---|
| SR602 | ~3m | Low | Small gadgets |
| AM312 | ~3m | Low | Battery-powered systems |
| RCWL-0516 (Microwave) | ~7m | Medium | Better for outdoor use |
❓ Frequently Asked Questions (FAQs)
Q1: What is the range of HC-SR501 PIR Sensor?
It detects motion from 3 to 7 meters, depending on the sensitivity adjustment.
Q2: Can I use HC-SR501 outdoors?
Technically yes, but it’s not waterproof. Use a sealed enclosure for outdoor projects.
Q3: How long is the output HIGH after motion?
It’s adjustable from 5 seconds to 5 minutes via the delay potentiometer.
Q4: Does the sensor detect pets or insects?
It can detect any warm moving object. For pet immunity, use filtering or alternate sensors.
Q5: How do I power the HC-SR501?
Use 5V DC (recommended), though it supports 4.5–20V input.
🏁 Conclusion
The HC-SR501 PIR Sensor is one of the most beginner-friendly and reliable components for motion detection. Whether you’re building a home automation system, smart security setup, or DIY project with Arduino, this sensor is a must-have in your electronics toolbox.
By understanding how it works and how to use it effectively, you can integrate it into various innovative applications. Plus, with adjustable settings, it’s incredibly flexible for many use cases.
👉 Want to Buy HC-SR501 PIR Sensor?
Click here to shop our tested and verified HC-SR501 sensor kits with FREE project guide.