Meta Description:
Discover everything about Arduino — how it works, types, pin configuration, features, and how to build your first circuit. Ideal for US beginners looking to learn electronics and DIY projects.
🧾 Introduction
Contents
- 1 🧾 Introduction
- 2 ✅ Key Features of Arduino
- 3 🧠 What Is Arduino?
- 4 🔍 How Does Arduino Work?
- 5 🔩 Pin Configuration (Arduino UNO)
- 6 🔢 Types of Arduino Boards
- 7 🛠️ How to Make Your First Arduino Circuit
- 8 🖥️ Installing and Using Arduino IDE
- 9 ⚡ Powering Arduino
- 10 🔗 Communication Methods
- 11 🧪 Common Arduino Projects
- 12 🧠 Arduino vs Raspberry Pi
- 13 🙋 Frequently Asked Questions (FAQs)
- 14 🎯 Conclusion
- 15 🔗 Suggested Internal Links:
In the world of DIY electronics and embedded systems, Arduino stands out as a beginner-friendly platform that powers millions of creative projects. From LED blinkers and smart homes to weather stations and robots, Arduino offers endless possibilities for anyone — hobbyists, engineers, students, or tech enthusiasts.
This complete guide will walk you through everything you need to know: what Arduino is, how it works, different board types, pin configurations, and even how to build your first project step by step.
✅ Key Features of Arduino
| Feature | Details |
|---|---|
| 🧠 Open-source | Freely available hardware and software tools |
| 🛠️ Easy-to-use IDE | Intuitive Arduino IDE for writing and uploading code |
| 🔌 USB Powered | Connects directly to a computer for power and programming |
| 🔄 Reusable | Can be reprogrammed repeatedly without needing extra hardware |
| 🔧 Wide compatibility | Works with thousands of sensors, displays, motors, and modules |
| 💡 Low learning curve | Suitable for both beginners and professionals |
| 🌎 Large community | Tons of tutorials, open-source libraries, and forums for help |
🧠 What Is Arduino?
Arduino is an open-source electronics platform based on easy-to-use hardware and software. The boards can read inputs (like light, temperature, or motion sensors) and turn them into outputs (like LEDs, motors, or displays).
You write code in the Arduino IDE, upload it via USB to the microcontroller, and it controls the hardware based on your instructions.
🔍 Arduino = Microcontroller Board + IDE + Community + Libraries
🔍 How Does Arduino Work?
At the core of Arduino is a microcontroller, typically from the ATmega family (like ATmega328P on Arduino UNO). Here’s the basic workflow:
- Input: Sensors or buttons detect data.
- Processing: Arduino reads this data and processes it based on your code.
- Output: Signals are sent to devices like LEDs, motors, buzzers, etc.
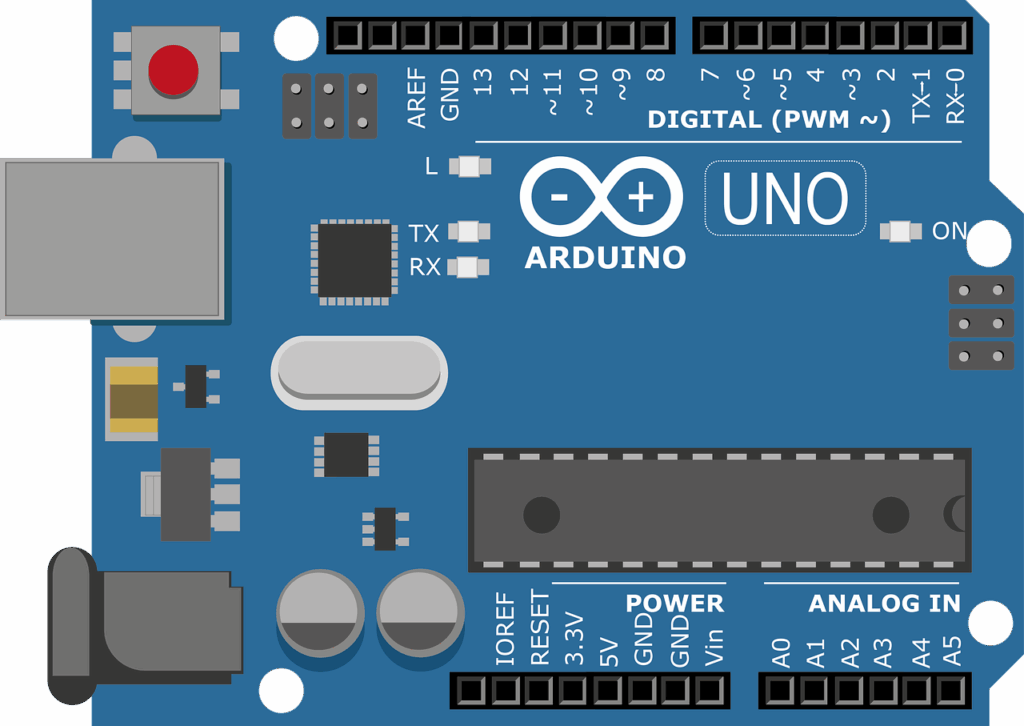
🔩 Pin Configuration (Arduino UNO)
Here’s a breakdown of the most popular board — Arduino UNO:
🔌 Power Pins:
- VIN: External power (7–12V)
- 5V / 3.3V: Output to power sensors/modules
- GND: Ground
🔁 Digital I/O Pins (0–13):
- Used for input or output
- Pins 0 and 1 are TX/RX (used for serial communication)
🎚️ Analog Input Pins (A0–A5):
- Used to read analog signals (0–1023 range)
⚡ PWM Pins (~3, 5, 6, 9, 10, 11):
- Can simulate analog output using
analogWrite()
📦 Other:
- AREF: Analog reference
- RESET: Resets the board
🧠 Tip: Use a breadboard and jumper wires for easy prototyping.
🔢 Types of Arduino Boards
There are many official Arduino boards. Here’s a quick overview:
| Board | Best For | Microcontroller | Special Features |
|---|---|---|---|
| Arduino UNO | Beginners, learning | ATmega328P | Most widely used |
| Arduino Nano | Compact projects | ATmega328P | Small and breadboard-friendly |
| Arduino Mega | Complex projects | ATmega2560 | 54 digital pins, 16 analog inputs |
| Arduino Leonardo | Keyboard/mouse emulation | ATmega32u4 | Can act as a USB HID device |
| Arduino Due | Advanced users | ARM Cortex-M3 | 32-bit processor, 84 MHz speed |
| Arduino MKR WiFi 1010 | IoT Projects | SAMD21 Cortex-M0+ | WiFi & Bluetooth onboard |
🛠️ How to Make Your First Arduino Circuit
👇 What You Need:
- Arduino UNO
- USB cable
- LED
- 220Ω resistor
- Breadboard
- Jumper wires
🔗 Circuit Diagram:
| Component | Connection |
|---|---|
| LED (Long leg) | Arduino Pin 13 (Digital) |
| LED (Short leg) | GND via 220Ω resistor |
📥 Arduino Code: Blink LED
cppCopyEditvoid setup() {
  pinMode(13, OUTPUT); // Set pin 13 as output
}

void loop() {
  digitalWrite(13, HIGH); // Turn LED on
  delay(1000);            // Wait 1 second
  digitalWrite(13, LOW);  // Turn LED off
  delay(1000);            // Wait 1 second
}
⚙️ Steps:
- Connect the circuit.
- Open Arduino IDE.
- Select the board and port.
- Upload the code.
- Watch the LED blink every second!
🖥️ Installing and Using Arduino IDE
Step 1: Download IDE
- Visit Arduino software
- Install for Windows, Mac, or Linux
Step 2: Connect Board
- Use a USB cable to connect your Arduino UNO
Step 3: Select Board & Port
- Go to Tools > Board > Arduino UNO
- Then Tools > Port > COMX
Step 4: Write and Upload Code
- Use the sketch editor to write code.
- Press the ✅ Verify button to compile.
- Press the ➡️ Upload button to send it to Arduino.
⚡ Powering Arduino
You can power Arduino in three ways:
- USB Cable – during programming
- Barrel Jack (7-12V) – for standalone projects
- Vin Pin – connect regulated power supply
⚠️ Avoid giving more than 12V — it can damage the board!
🔗 Communication Methods
Arduino can communicate with other devices using:
- Serial (UART) – USB or TX/RX
- I2C – Two-wire interface (SDA/SCL)
- SPI – Fast peripheral communication (MOSI/MISO/CLK)
- Bluetooth/WiFi – with modules like HC-05 or ESP8266
🧪 Common Arduino Projects
| Project Name | Skills Learned |
|---|---|
| LED Blinker | Digital output, delays |
| Line Following Robot | Motor control, IR sensors |
| Temperature Logger | Sensor reading, SD card |
| Bluetooth-Controlled LED | Wireless communication |
| Smart Plant Watering System | Automation, soil sensors |
| Motion Sensor Light | PIR sensors, interrupts |
🧠 Arduino vs Raspberry Pi
| Feature | Arduino | Raspberry Pi |
|---|---|---|
| OS | None | Linux-based OS |
| Programming | C/C++ | Python, more |
| Real-time | Yes | No |
| GPIO | Basic control | Advanced with CPU |
| Use Case | Hardware-centric | Software/networking |
They are often used together in advanced IoT projects!
🙋 Frequently Asked Questions (FAQs)
Q1: Is Arduino good for beginners?
Yes, it’s designed for people with no prior electronics or programming experience. It’s widely used in schools and by hobbyists.
Q2: Do I need to know coding to use Arduino?
Basic coding helps, but many tutorials and code examples are available. You’ll learn as you build.
Q3: Can Arduino run without a computer?
Yes! Once programmed, Arduino can run independently using external power like batteries or adapters.
Q4: What language is Arduino code written in?
Arduino uses a simplified version of C++ with its own custom functions.
Q5: Is Arduino IDE free?
Yes, the Arduino IDE is open-source and 100% free to download and use.
Q6: Can I use Arduino with WiFi?
Yes. You can use ESP8266, ESP32, or MKR series boards with built-in WiFi for IoT projects.
🎯 Conclusion
Arduino opens a whole new world for anyone interested in electronics, automation, robotics, or IoT. It’s simple, affordable, and supported by a massive community.
With just a few components and some code, you can build impressive devices — from blinking LEDs to fully automated systems. Start small and scale up as you go!
🚀 Ready to build your first Arduino project? Check out our DIY Electronics Projects Hub for beginner-friendly tutorials.