
Imagine a small robot car that senses obstacles in front of it and smartly changes direction — all by itself. Sounds fun, right? In this project, we’ll build a DIY obstacle avoiding car using Arduino and an ultrasonic sensor. It’s a fantastic introduction to robotics, sensors, and automation, especially for electronics enthusiasts and students.
Project Overview
Contents
An obstacle-avoiding car is a robot that detects obstacles in its path using an ultrasonic sensor and then decides to turn left or right to avoid a collision. It’s like giving your robot a pair of “eyes” and a “brain.”
Whether you’re a beginner or an intermediate-level DIYer, this project will help you understand:
- Sensor integration
- Motor control
- Logic building
- Real-time decision-making
Components Required
| Component | Quantity |
|---|---|
| Arduino Uno / Nano | 1 |
| Ultrasonic Sensor (HC-SR04) | 1 |
| L298N Motor Driver Module | 1 |
| DC Gear Motors with Wheels | 2 or 4 (depending on chassis) |
| Robot Car Chassis | 1 |
| Jumper Wires | As needed |
| Battery Pack (7.4V or 9V) | 1 |
| Mini Breadboard (optional) | 1 |
| Servo Motor (optional for sensor rotation) | 1 |
💡 You can also add a servo motor to rotate the sensor for smarter scanning (advanced version).
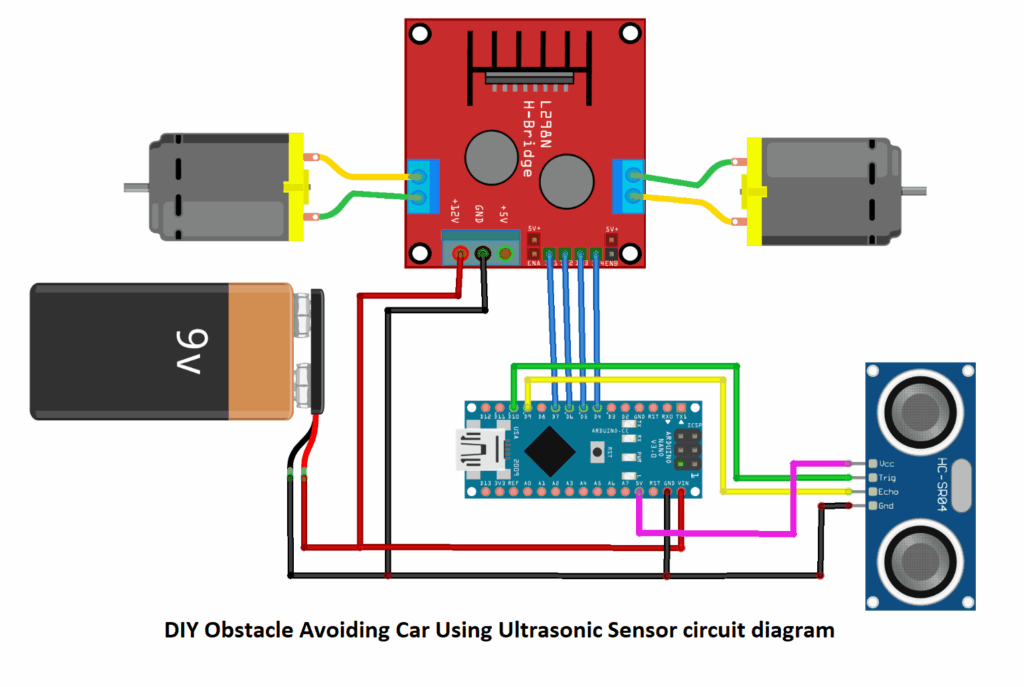
Circuit Diagram
Here’s how the connections are done:
Ultrasonic Sensor (HC-SR04) to Arduino:
| HC-SR04 Pin | Arduino Pin |
|---|---|
| VCC | 5V |
| GND | GND |
| Trig | D9 |
| Echo | D10 |
L298N Motor Driver to Arduino:
| L298N Pin | Arduino Pin | Function |
|---|---|---|
| IN1 | D2 | Motor A control |
| IN2 | D3 | Motor A control |
| IN3 | D4 | Motor B control |
| IN4 | D5 | Motor B control |
| ENA/ENB | 5V (or use PWM pins for speed control) | |
| GND | Common GND with Arduino | |
| VCC (Motor) | Battery Positive (7–12V) |
⚠️ Don’t forget to connect GND of Arduino, battery, and motor driver together.
How It Works
- Ultrasonic sensor sends out sound waves and waits for them to bounce back from an obstacle.
- Using the time difference between sending and receiving, the Arduino calculates distance.
- If the distance is greater than 20 cm, the car moves forward.
- If the distance is less than 20 cm, the car stops and turns (left/right) to avoid the obstacle.
It’s like the robot thinks:
“Oh! Something is in my way. Let me turn around.”
Arduino Code for Obstacle Avoiding Car
Here’s the complete working code with explanations:
cppCopyEdit// Motor driver pins
int IN1 = 2;
int IN2 = 3;
int IN3 = 4;
int IN4 = 5;

// Ultrasonic sensor pins
int trigPin = 9;
int echoPin = 10;

long duration;
int distance;

void setup() {
  pinMode(IN1, OUTPUT);
  pinMode(IN2, OUTPUT);
  pinMode(IN3, OUTPUT);
  pinMode(IN4, OUTPUT);

  pinMode(trigPin, OUTPUT);
  pinMode(echoPin, INPUT);

  Serial.begin(9600);
}

void loop() {
  // Trigger the ultrasonic sensor
  digitalWrite(trigPin, LOW);
  delayMicroseconds(2);
  digitalWrite(trigPin, HIGH);
  delayMicroseconds(10);
  digitalWrite(trigPin, LOW);

  // Read the echo time
  duration = pulseIn(echoPin, HIGH);
  distance = duration * 0.034 / 2; // Convert to cm

  Serial.print("Distance: ");
  Serial.println(distance);

  if (distance < 20) {
    stopCar();
    delay(200);
    turnRight();  // You can randomize this later
    delay(400);
  } else {
    moveForward();
  }
}

// Movement functions
void moveForward() {
  digitalWrite(IN1, HIGH);
  digitalWrite(IN2, LOW);
  digitalWrite(IN3, HIGH);
  digitalWrite(IN4, LOW);
}

void turnRight() {
  digitalWrite(IN1, LOW);
  digitalWrite(IN2, HIGH);
  digitalWrite(IN3, HIGH);
  digitalWrite(IN4, LOW);
}

void stopCar() {
  digitalWrite(IN1, LOW);
  digitalWrite(IN2, LOW);
  digitalWrite(IN3, LOW);
  digitalWrite(IN4, LOW);
}
Upgrades & Variations
Want to make your robot smarter? Try these:
- Add a Servo: Mount the ultrasonic sensor on a servo motor. Scan left/right before turning for better decisions.
- Use Infrared Sensors: For line following or edge detection.
- Add Bluetooth: Control it manually via an app when needed.
- Use a Buzzer or LED: For alerts when an obstacle is near.
Real-World Applications
Obstacle avoidance is not just for fun robots. It’s the base concept behind:
- Autonomous vehicles
- Robotic vacuum cleaners
- Warehouse navigation robots
- Smart lawn mowers
FAQs (Frequently Asked Questions)
1. Can I use Arduino Nano instead of Uno?
Yes, absolutely! Just make sure to match the pins correctly.
2. My car is moving in reverse, what to do?
Reverse the motor wires or swap IN1/IN2, IN3/IN4.
3. What if the car doesn’t avoid obstacles properly?
Check sensor wiring, test distance values in serial monitor, and adjust the distance threshold in code.
4. Can I run this on rechargeable batteries?
Yes. A 7.4V Li-ion battery or 9V battery works, but make sure it supplies enough current for both motors.
5. Can I control motor speed?
Yes, connect ENA and ENB to PWM pins (like D6/D11) and use
analogWrite().
Conclusion
The DIY Obstacle Avoiding Car project is one of the most exciting and educational builds you can do as a beginner or hobbyist. It teaches you a lot about sensor input, motor control, logic design, and real-world automation.
Once built, you’ll feel like you’ve just taken your first step into robotics — and believe me, it feels great!